
Build the Ultimate DIY Vertical Jungle Gym for Your Apartment Cat (Using Reclaimed Materials)
If you live in an apartment with a cat, you know "the look." It’s that longing gaze out the window, a wistful stare at a bird flying past, a moment where your sleek house panther seems to be dreaming of the wild trees and high branches they'll never climb. It can fill a loving cat owner's heart with a pang of guilt. How can you give your cat an adventurous, stimulating world within the confines of four walls?
The answer? You don't build out, you build up.
Welcome to your ultimate guide to creating a vertical jungle gym—a "cat superhighway"—that will transform your apartment into the feline paradise of your cat's dreams. And the best part? You don't need to spend a fortune on a fancy, store-bought cat tree that doesn't quite fit your space or style. We're going to unleash your inner DIY warrior and show you how to build a custom, sturdy, and stunning cat gym using sustainable, affordable, and character-rich reclaimed materials.
This project is more than just a cat tree; it's an act of love. It’s a way to speak your cat's language—the language of climbing, perching, and surveying their kingdom from on high. So grab a coffee, get inspired, and let's get ready to build something truly special for your best furry friend.

Giving your cat vertical space isn't a luxury; it's essential for their confidence and well-being.
Table of Contents
- Section 1: Why Go Vertical? The Science of a Happy Apartment Cat
- Section 2: The Treasure Hunt: Sourcing Your Reclaimed Materials (Safely)
- Section 3: Design & Inspiration: Planning Your Cat's Custom Kingdom
- Section 4: The Build: Your Step-by-Step Construction Guide
- Section 5: The Grand Opening: Introducing Your Cat to Their New Gym
- Section 6: FAQ: Your DIY Cat Gym Questions Answered
- Section 7: A Final Word: The Joy of a Hand-Built Home
Section 1: Why Go Vertical? The Science of a Happy Apartment Cat
Before we pick up a single tool, it's important to understand *why* this project is so transformative for an indoor cat. This isn't just about giving them something to climb; it's about fulfilling their deepest, hardwired instincts.
Feline behavior experts like Jackson Galaxy call this concept "Catification"—the art of designing your home in a way that caters to a cat's natural needs. Here’s why vertical space is at the top of the list:
- Safety and Security: In the wild, high places provide a safe vantage point from which to spot predators and prey. For a domestic cat, being up high allows them to feel secure and observe the household happenings from a safe distance.
- Territory Expansion: In a small apartment, floor space is limited. By going vertical, you exponentially increase your cat's perceived territory. This is especially crucial in multi-cat households, as it allows them to share the same room without competing for the same spot on the floor.
- Exercise and Enrichment: A vertical gym encourages jumping, climbing, and stretching, providing essential physical exercise that keeps your cat healthy and fit. It also prevents boredom, which is a leading cause of destructive behaviors like scratching furniture or over-grooming.
- Confidence Building: For a timid or shy cat, having the ability to navigate a high-up "superhighway" can be a massive confidence booster. It gives them control over their environment and their social interactions.
Section 2: The Treasure Hunt: Sourcing Your Reclaimed Materials (Safely)
This is where the fun begins! Building with reclaimed materials is not only eco-friendly and budget-conscious, it also results in a one-of-a-kind piece with far more character than anything you could buy in a store.
Where to Look for Materials
Think like a scavenger. Your community is full of hidden gems. Since we're here in Ottawa, let's think locally:
- Online Marketplaces: Check Kijiji, Facebook Marketplace, and local Buy Nothing groups daily. People are constantly giving away old shelves, wooden furniture, and leftover project materials.
- Lumber & Hardware Stores: Head to the "off-cut" bin at places like Home Depot or smaller local lumber yards. You can find perfectly good scraps of wood for pennies on the dollar.
- Thrift Stores: Look for solid wood items like small shelves, sturdy woven baskets (for perches), or wooden crates.
- Your Own Home: Do you have an old, rickety wooden ladder in the garage? An unused bookshelf? Leftover carpet from a renovation? You might already have the perfect materials.
- Nature (with caution): A thick, sturdy branch can make a fantastic, naturalistic ramp or perch. We'll cover how to treat it safely below.
Your DIY Shopping List
- Structural Elements:
- Wood Planks: Solid, untreated pine or spruce boards are ideal. Look for 1x8 or 1x10 boards for comfortable lounging shelves.
- Plywood: A sturdy sheet of 3/4-inch plywood is perfect for cutting custom-shaped shelves.
- Wooden Crates: Wine crates or small packing crates make excellent cubby holes.
- Old Ladders: A rustic wooden ladder can be mounted horizontally to create an instant multi-level climber.
- Surface Materials:
- Sisal Rope: Essential for creating satisfying scratching surfaces. Get 1/4-inch or 3/8-inch thickness.
- Carpet Remnants: Ask a local flooring store for scraps. Low-pile, looped carpet is durable and less likely to snag claws.
- Cork Tiles or Yoga Mats: These provide excellent grip and are easy to cut to size.
- Hardware & Tools (Non-negotiable for safety):
- Heavy-Duty Metal Shelf Brackets
- A Good Drill with Drill Bits
- A Stud Finder (This is your most important tool!)
- A Level
- Wood Screws of various lengths
- Sandpaper (medium and fine grit)
- A Staple Gun (for attaching rope and carpet)
Safety First: Materials to AVOID
Your cat's safety is the number one priority. Do not use the following materials:
- Pressure-Treated, Stained, or Painted Wood: These can contain chemicals (like arsenic or volatile organic compounds) that are toxic to cats if chewed or licked. Stick to raw, untreated wood.
- Particleboard or MDF: This cheap composite wood does not hold screws well under weight and can easily break, leading to a dangerous collapse.
- Anything Wobbly or Unstable: If a piece of furniture is already rickety, don't use it.
- Wood from Toxic Trees: If sourcing a branch, avoid cherry, black walnut, and yew trees, among others. When in doubt, stick to kiln-dried lumber.
Section 3: Design & Inspiration: Planning Your Cat's Custom Kingdom
Now you get to be an architect! Before you drill a single hole, map out a plan.
- Observe Your Cat's Habits: Where do they already love to be? Is there a specific window they love to look out of? A patch of sun they always nap in? Design your gym to enhance these favourite spots.
- Assess Your Wall: Choose a wall where you can create a significant vertical run. Use your stud finder to locate the studs and mark them lightly with a pencil. Your design MUST be based on where you can securely anchor into these studs.
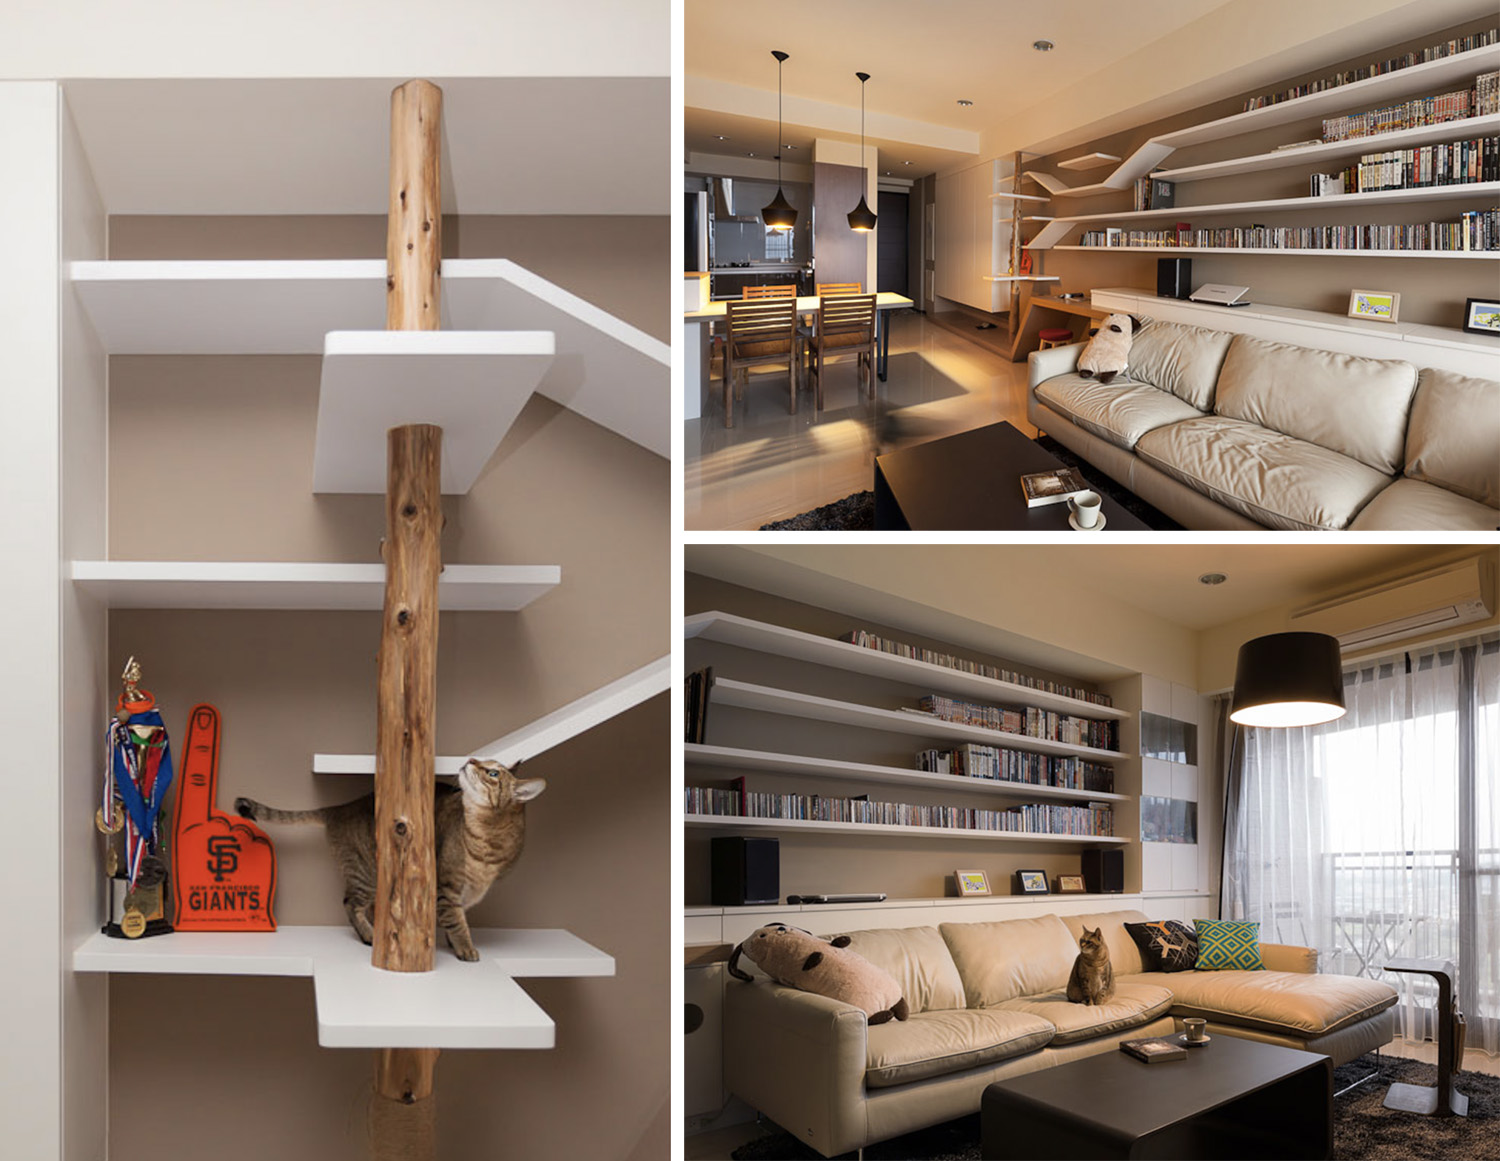
- Sketch Your Design: Grab a pencil and paper and draw a rough sketch. Think about flow. How will your cat get from A to B? A good rule of thumb is to place shelves no more than 12-16 inches apart vertically and horizontally to ensure easy, safe jumps.
Incorporate a variety of elements:- Wide, comfortable shelves for lounging.
- Taller, smaller perches for surveying.
- Vertical posts wrapped in sisal rope for scratching and climbing.
- A ramp or bridge to connect two sections.
- A cozy cubby hole for a secure napping spot.
A simple sketch helps you visualize the flow and placement of each element on your wall.
Section 4: The Build: Your Step-by-Step Construction Guide
Alright, it's time to make some sawdust! Put on some music, clear a workspace, and let's get building.
Step 1: Prep Your Materials
Thoroughly clean all your reclaimed wood and materials with a pet-safe cleaner (a simple solution of vinegar and water works well). Once dry, sand every wooden surface until it's completely smooth. You don't want any risk of splinters for those precious paws. Cut your boards and plywood to the sizes you determined in your design plan.
Step 2: Prepare the Surfaces
This is where you add the cat-friendly textures.
- For Scratching Posts: Take a wooden post or a thick, treated branch. Secure one end of your sisal rope to the back/underside of the wood with a few staples. Wrap the rope as tightly as you possibly can around the post, with no gaps. When you reach the end, secure it again with several staples on the back.
- For Shelves: Cut your carpet remnant or cork tile to the exact size of your shelf. Use a non-toxic wood glue or a staple gun (stapling on the underside of the shelf) to attach it securely.
Step 3: The Most Important Step - Find the Studs!
I'm repeating this because it is the difference between a safe cat gym and a disaster. Drywall will not hold your cat's weight. Use your stud finder and mark the center of every stud you will be using. Double-check your measurements.
Step 4: Install the Brackets
Using your level to ensure they are perfectly straight, drill pilot holes and then securely screw your heavy-duty shelf brackets into the wall studs. Use screws that are long enough to go at least 1.5 inches into the stud itself. Give each bracket a firm tug to ensure it's rock-solid.
Step 5: Mount the Elements
Place your prepared shelves, crates, and other elements onto the brackets. Secure them to the brackets from underneath using more wood screws. Again, test every single piece for stability. Wiggle it, push on it, pull on it. If there is ANY give, add more screws or a better bracket. Your cat's life depends on this stability.
The moment of truth! A safe and successful introduction is the final step in your DIY journey.
Section 5: The Grand Opening: Introducing Your Cat to Their New Gym
You did it! The gym is built! But don't be surprised if your cat is initially skeptical. Cats can be wary of new things. It's your job to show them this amazing new thing is for them.
- Use Lures: Use their favourite feather wand, a laser pointer, or some high-value treats to entice them onto the first shelf.
- Place Familiar Scents: Rub some catnip on the scratching posts or place their favourite small blanket on one of the lounging shelves.
- Be Patient: Never force your cat onto the structure. Let them explore it in their own time.
- Praise Lavishly: When they do start to explore, shower them with praise, pets, and treats. Build a positive association from the very first interaction.
Section 6: FAQ: Your DIY Cat Gym Questions Answered
Q: I'm renting my apartment. How can I do this without drilling holes in the wall?
A: You have options! Look for a tall, very sturdy, solid wood bookshelf as your base. You can add shelves, platforms, and ramps to it without touching the walls. Alternatively, you can design a floor-to-ceiling gym using tension poles (like those used for shower curtains, but much stronger) as the main supports.
Q: My cat built-in wardrobe is ignoring my beautiful creation. What did I do wrong?
A: You likely did nothing wrong! Cats are cautious. Give it time. Try playing with them near the gym every day. Leave a trail of their favourite treats leading up to the first level. Spritz it with a catnip spray. Make it the most interesting place in the room, and eventually, their curiosity will win.
Q: Is it really safe to use a branch from my backyard?
A: It can be, with proper preparation. First, ensure the branch is from a cat-safe tree (like maple or birch). Let it dry out completely for several weeks. Then, to kill any bugs or mold, you should bake it in your oven at a low temperature (around 200°F or 95°C) for a couple of hours. It must be completely sturdy with no rotting sections.
Section 7: A Final Word: The Joy of a Hand-Built Home
There are few things more rewarding than watching your cat confidently leap onto a shelf you built, stretch out on a scratching post you wrapped, or nap peacefully in a cubby you designed just for them. You haven't just built a piece of furniture; you have fundamentally improved their world. You've provided enrichment, security, and endless opportunities for play.
You took cast-off materials and, with your own two hands, created a kingdom. Now sit back, relax, and enjoy watching your little monarch survey their new domain. You've earned it, and they'll thank you for it in countless happy purrs to come.